

You will need:
1. Papier-mâché heart (mine has been primed with matt emulsion paint beforehand)
2. selection of printed napkins/dinner serviettes
3. selection of stamps, flowers and embellishments
4. Decopatch glue (watered down PVA would work too).
5. Old paintbrush and a pencil.

After priming your papier-mâché heart, separate the plies of the serviettes. Depending on how transparent you want the images/patterns to be, you can either use the printed ply only or leave the second white ply for crispier images.

Add some stamping with inks and acrylic paints for added interest.


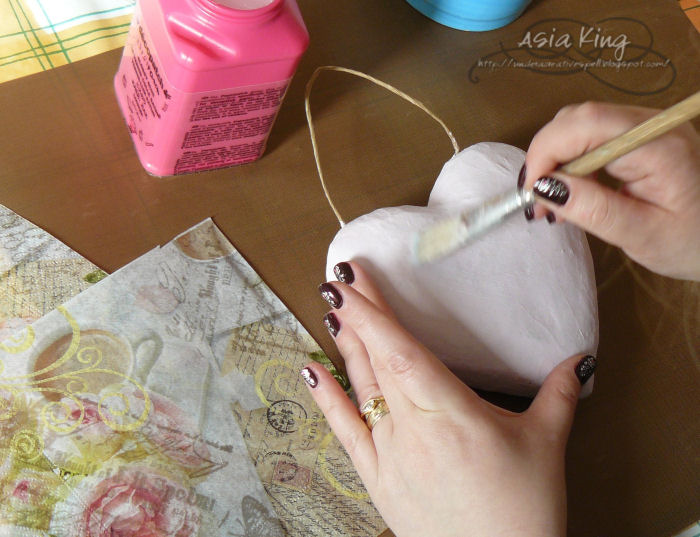
When you are ready to cover your heart, using an old paintbrush apply an even layer of glue (not too much but not too little either)
Cover the heart with the napkin, crimpling it gently as you go. I love the extra texture you get with the little creases and they will also help you hide any accidental tears. Once you've got the main side covered, cut the napkin in a few places where the heart curves. This will help you with glueing and overlapping the napkins in those tricky parts.

Glue all overlapping excess napkin in place around the sides of the heart.

On another piece of serviette draw around the shape, allow a margin to cover the entire back of the heart.

You can also add scraps of napkin to the sides for full coverage, if necessary.

Fussy cut some images from other napkins to compliment your design. Try to cut quite close to the printed image, but you don't have to be too precise. The napkins will blend in nicely and you will hardly see the areas around the added images, if at all.

After you are finished with collaging your images onto the background napkin, apply a generous layer of the glue to varnish it. Allow it to air dry fully. When dry, you can add some shimmering mists for an added sparkle.


To finish, add a selection of embellishments.

To embellish my heart I added a handful of beautiful flowers (Prima and Petaloo), ribbons, pearl pins and a cheese cloth, for a lovely shabby chic look.

Behind the flowers I tucked in this amazing, gorgeous, beautiful, heart-squeezing image from Paperbag Studios (Dress Up) which I recently won from the Happy Daze shop (thank you so much!!! x).
I hope you've enjoyed this little tutorial and are inspired to try some napkin art - make sure to let me know what you created! Next time you have a fancy dinner with beautuful serviettes, think twice before you throw any away! lol ;)).
If you're looking for more shabby chic decoupage inspiration, check out my altered mixed media vanity box and my dry decoupage technique video tutorial.
Enjoy the weekend!
Big hugs
Ps. The super lucky winner of my 2nd Blogaversary candy will be announced tomorrow!


34 comments:
I just love this decorated heart! So adorable!
Very nice and beautiful heart Joanna.
Love it very much.
Greetings Janny
O my word Joanna,, this is fabulous thanks for taking the time to share, This is top of my to-do-list.. I love it!!! Happy weekend, Hugs May x x x
It's just gorgeous! Thank you!
Gorgeous work Joanna, I've never tried using napkins so thanks for the tutorial
have a great weekend
Claire xx
Fantastic work and tutorial. Thanks for sharing.
Claire xxx
Gorgeous, and what fantastic inspiration thank you.
Hugs Ali x
Thank you for this beauty!!!
Very Nice. Lovely TUT as well thanks for sharing Dxx
Terrific tutorial, clearly illustrated and the finished hearts are just beautiful - a great use for those pretty napkins. Elizabeth x
Fabulous work Joanna and a great tutorial. I have tried all sorts of glues including decopatch and found the napkins tore so easily using them. In the end I used a builders PVA bond which is the one I prefer. You have made it look so easy here so I must have been using it differently in some way. TFS your tutorial. xox
Loving your beautiful heart Asia. x
that is truly scrumptious Joanna
That is so gorgeous, I know the technique, but this is so beautiful... I had to react!
You have such a lovely heart! Great technique and what a pretty use of decorative napkins. I once did a glass plate for Christmas, using fabric and crackle paint. I have a ton of napkins and can't remember what I was going to do with them!
Ojej ale fajnie Ci to idzie :) Dziękuję za tutorial. Serce wygląda pięknie :)
ps. jak ładnie nazwałaś stempelek z dziewczynką :)
Wygląda prześlicznie! Nie wpadłabym na to żeby stemplować serwetkę :D..
I like this idea :)
Hi Joanna this is so beautifully. Thanks for sharing your fabulous technique and tutorial with us. I simply adore it. Wonderful work. Have a great day. X
your tutorial is great and the heart looks gorgeous.xxxxx
Thanks so much for sharing this Joanna, Your heart looks just gorgeous and love all the pretty added embellishments.
Hugs, Fliss xx
I adore this heart ... great tutorial thanks so much for sharing
Such a gorgeous project and a fab tutorial, I love the sentiment too, thanks for sharing
Lindsay xx
Joanna this is soooo beautiful! I have NEVER tried anything like this and not even sure what PVA glue is??? Can you use something like Mod Podge (I'm not even sure if that is the right name) but I think I have this, will it work? I guess I have always used my matte varnish for my painting. I am so taken with this idea, it is so gorgeous!
Hello Joanna :)
Thank you SOOOOO much for the most inspiring tutorial. That was amazing seeing such a gorgeous piece of work take shape. Wonderful idea and thank you for sharing it.
Hope you are doing well.
Hugs to you,
Lisa xx
Just wonderful. Love the look and thanks for the share! Kim
Hello Pendra! PVA is one of the most common white glues, for example wood glue or even a simple school glue is likely to be PVA as well. I am sure that Mod Podge will work, too. Good luck and let me know how you get on! x
I'm missing words, your heart looks really wonderful.
You are such a caring girl Joanna and one fabulous crafter, thank you for such an amazing tutorial.
Hugs Shirley x x
This looks amazing.. I would love to try one of these.. Thanks so much for the tutorial..
absolutely gorgeous creation! love the little girlstamp, one of my favourites as it reminds me of my niece :)
Saw this on SCS and just had to come by and learn more. This so charming. I an anxious to experiment with this technique myself.
WOW!!!!!!!! This is awesome!!!!!!!!!!
I do hope you don't mind but I have added a link to this post on my blog.
I am soooo going to have a go as soon as I get time - I did actually buy some napkins to try this out and am most definitely going to follow your tutorial now - Thanks.
Post a Comment