Sunday 9 January 2022

Magic Christmas Memories

One, two, three, one, two, three... keyboard test :). Well hello crafty peeps and a very happy New Year to you all! It's been a while since I last blogged... I hope you have been keeping well.

I don't get to craft much these days. My crafty mojo seems to come and go as it pleases and it's not always possible to catch it at a convenient moment lol 😀. It seems though that it tends to make a brief appearance around Christmas and the festive period so I thought I'd share my most recent Christmas themed make with you. 

This scrapbook layout took me a year to complete from when I made my background... I know! 😱 I guess, the creative process needed some time to mature ha ha ha. 😵 Luckily this sketch gave me an idea how to finish my layout.


I absolutely love this photo of my Dad and the little me (many many moons ago!) saying 'hello' to Santa. I wanted to create a page that would reflect my memories of Christmas when I was a child. 

In Poland, Christmas celebrations start with a festive family dinner on Christmas Eve and that's when we also get our Christmas pressies from Gwiazdor (a Polish equivalent of Father Christmas). It was my family's tradition that, before we sat at the table, my brother and I would always go outside to wait for the first star to appear in the sky. When it did, it was time to start our celebrations. 

In that short period of time that we were outside Gwiazdor would always visit our home to leave presents under the Christmas tree. As you can imagine the arrival of that first star in the sky always had something really magical about it.

NB. I've got no idea what used to happen on cloudy Christmas Eves where we couldn't see any stars... I don't recall having to sit outside all night so there must have been an alternative plan of some sort ha ha ha!


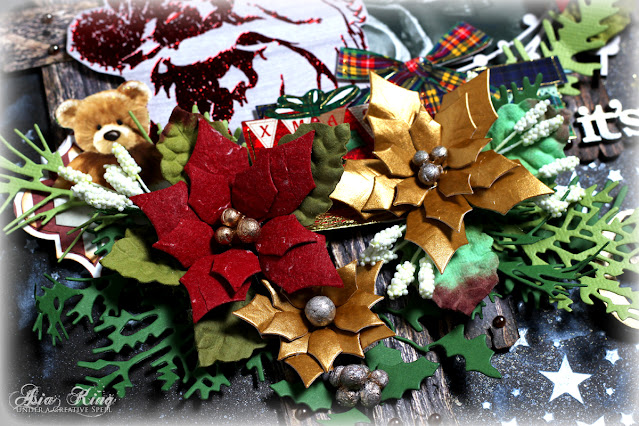
For my background I used a Sleigh & Reindeer (Dreamweaver) and a star background stencil and various embossing pastes from Dreamweaver. I also added some lovely shimmer with Heirloom Gold Perfect Pearls mist.

The wooden planks have been 'freestyled' from patterned paper, inked with distress inks, and embossed with wood texture embossing folders. I've not tried this technique before, and I love how these came out. The texture is just fab! 


The beautiful chippies are from Dusty Attic and I painted them with DecoArt paints. I secured them to the page using my trusty Adhesive Sheets.


I die cut some poinsettias and added lots of foliage to embellish my page. I also fussy cut a handful of lovely elements from old Christmas cards. I layered them using 3D Adhesive Dots.


Thank you for stopping by and I hope you enjoyed walking down the Christmas memory lane with me. That's all from me for now. Till next time... 

Big crafty hugs

Asia King Blog signature_small

Follow on Bloglovin
♥ Follow Me On Bloglovin'

I am entering the following challenges:
Country View Challenges Jan 2022 - Your Year to sparkle and shine
Simon Says Wednesday Challenge - Something New
The Scrappy Sketches - Mapka


Read More

Wednesday 7 November 2018

#lovely Plum Crazy Tag


Re-edited: I am absolutely thrilled to say that my tag has been chosen as one of the winners of the Dusty Attic's November Moodboard challenge!!! Yay!!  :)

Hello my lovelies,

I hope you're managing to keep away from the wind and autumnal chill and are crafting away something fabulous instead :).

I'd like to share a little tag I created, having a deep plum v autumnal vibe in mind.

I don't get much time (or mojo, sadly...) to craft these days but I was totally bowled over with the Dusty Attic's November moodboard inspiration photo. I love all things purple and the yummy plums on the collage got my creative juices going. Oh, and what about that yummy looking cake with the beautiful leafy crust? So 'Thank you' Dusty Attic for such a delicious inspiration to get me crafting again! Yay! :)

I just couldn't resist it, so I thought I would try to create something for their November challenge. The DT are actually all playing with notebooks this month but that wasn't where my creative muse was taking me, sorry! And since she's a very capricious lady I had to follow the path she was leading me on lol :).


The patterned paper base of my tag includes some stamping and  'double (or triple even?) embossing'. First, I debossed the tag with a Cuttlebug embossing folder and then I embossed the impressed image with Garnet Grenat embossing powder. Then I added some stamping with the Brush Stroke stamp and embossed it with Rose Gold powder.

I also decided to paint some artificial leaves with DecoArt paints to wrap my bouquet of 'harvested' flowers, berries, foliage and frilly grasses.


The flowers and the tag were tinted with Merlot spray ink and I generously sprinkled my harvest bouquet with Mini Prills and Twinklets Diamond Dust. I also added a #lovely chippy from the Dusty Attic Hashtag Sayings #2 set. I heat embossed it with Honey Miel and Rose Gold powders.


Main supplies:
Stampendous: Brush Strokes stamp, embossing powders in Honey Miel, Rose Gold, PEARLustre Garnet Grenat
Scrapbook Adhesives by 3L: 3D Foam Squares - Black, Dual Tip Glue Pen, Extreme Double-sided Tape
Dusty Attic - Hashtag Sayings #2
DecoArt: Metallic Lustre - Champagne Ice, Americana acrylics in Country Red, Royal Fuchsia, Dioxazine Purple, Bittersweet Chocolate, Snow White
Distress Inks: Seedless Preserves, Dusty Concord, Aged  Mahogany, Forest Moss, Black Soot
Memories Most - Merlot


I might have gone a bit crazy with my embellies but hey, who was I to argue with my creative muse if that's what she craved?! lol :)

That's all from me for now, my Friends! Thank you for stopping by and for any lovely comments you may wish to leave to let me know you've been!

Have a very creative week!

Big crafty hugs

Asia King Blog signature_small

Follow on Bloglovin
♥ Follow Me On Bloglovin'

I'm also entering the following challenges:
Frilly and Funkie - A Harvest of Gratitude challenge
Simon Says Stamp Wednesday Challenge - Thanks/Thanksgiving
Rhedd's Creative Spirit - Anything Goes
A Vintage Journey - Paper Stash
Read More

Saturday 13 October 2018

Peeking Out From Behind Autumnal Leaves...

So.... It's been a while, hasn't it? I hope you're all keeping well! :)

I thought I would show you this little project I made a while ago but just haven't had a chance to share.

This is a little layered mini album / shadowbox thinggy I made as a keepsake from my nephew's Christening. I was inspired by the awesomeness of layered shadow card kits from Heartfelt Creations. I didn't have the exact supplies so decided to free style it and create my own thing using a selection of dies (Spellbinders and Marianne's Design).....

Mini Prills vintage flowers


and punches and flowers from Hobbycraft and 49 and Market...

Shabby chic handmade card

and Mini Prills and lots of other lush embellies... :). All secured in place with a range of adhesives from Scrapbook Adhesives by 3L.

baby keepsake


Thank you so much for your visit today...

Big crafty hugs!

Asia King Blog signature_small

Follow on Bloglovin
♥ Follow Me On Bloglovin'

I would like to enter the following challenges:
Country View Challenges October - Plant-tastic
Simon Says Wednesday Challenge - Anything But a Card
JUGS #462 - Celestial Elements (stars)
Read More

Monday 25 December 2017

Christmas is in the Air!

Yes! It's finally Christmas!!!

I'd like to wish you all a very happy Christmas, full of joy, love and blessings. I hope that the festive season allows you to enjoy the company of all your loved ones and that your hearts take comfort in remembering those who can no longer be there with you.

Here's the second Christmas card I made this year. In my last post with the vintage Poinsettia Card I mentioned that I have only been able to make a very few cards this year.

This year I was in a die cutting mode and for this card I played with the Tim Holtz Sizzix dies Victorian Carolers and Holiday Lamppost. The lovely glow in the lamp is down to the Rowlux illusion film, which is one of the coolest products ever! I previously used it in my Halloween lantern and I think it's perfect for light related accents.


The banner was stamped and heat embossed using Stampendous Christmas Air stamp and Detail Gold Embossing Powder.


To embellish my card a little I threw in some glitter and a few gold stars. As always, I've used adhesives from Scrapbook Adhesives by 3L.


I also made these couple of cards, simpler in design, but as you will see I was still in the die cutting mode :)

For these cards, I die cut my Vintage Noel signs from 3D Foam Creative Sheets and sprinkled them with the super lush Lime Micro Glitterand Maroon Micro Glitter.

Oh, and I added multiple accents using tissue/washi tapes  :).

That's all from me for today! Thank you for stopping by and for all your sweet comments!

With warmest festive wishes


Follow on Bloglovin
♥ Follow Me On Bloglovin'


I would also like to enter the following challenges:
Country View Challenges - December 2017 Christmas
A Vintage Journey - Winter Wonderland

Fashionable Stamping Challenges - Celebrate
Read More

Saturday 23 December 2017

On the Eve of Christmas Eve

Hello Friends!

Blimey! Where has the time gone?! I know I always promise (including to myself) to craft and blog more, but life has been so busy... non-crafty things always seem to get in the way... I'm sure you all know what I mean. So please forgive me for being such a poor blogger and visitor of late... I do try to visit your beautiful blogs whenever I can, although I don't always have enough time to let you know I've been...  But I do and will try to organise myself better soon! :)

Last time I blogged it was Halloween, and now it's nearly Christmas! Sheesh... I'm almost ready with my preparations. What about you? This year I only managed to make a few Christmas cards, which I hope to share over the coming days...

The first one up... is this frosty Poinsettia card.
best die cutting machine

With this year's cards I was totally in a die cutting mode so I decided to dust off my lush Cut 'N' Boss Machine (one of the best and most memorable gifts I've ever received! - thank you Santa!). I played with a selection of dies I've had for years but (please don't tell anyone, especially my hubby!)) never actually used before...Gasp! Please don't judge me... I'm sure you all know all too well what happens when a good sale comes up and you end up buying supplies in wholesale quantities...! Some dies are like a good wine, you leave them unopened to mature and they just get far better with time.. LOL :)

how to layer a poinsettia
For this card I used the following dies and punches:
Tim Holtz Sizzix Tattered Poinsettia
Stampendous Dreamweaver Holly and Swirls DL3005
Spellbinders Layered Poinsettia
Marianne Creatables Dies LR0181
Martha Stewart Pine Branch

Christmas berries and poinsettia arrangement


I also used the following supplies:
Scrapbook Adhesives by 3L: DODZ 3DAdhesive Dots SmallE-Z Runner Grand Refillable Dispenser
Papers: Simple Stories - December Documented
Dylusions Ink Spray - White Linen

Martha Stewart pine branch bough punch


That's all from me for now! Tomorrow is Christmas Eve (yay!), and that's when me and my family will be gathering for our Christmas Eve dinner to celebrate the reason of the season... and that's when we get to open our Christmas pressies! Soooo excited to see what Santa prepared for me this year! :)

Thank you so much for stopping by today and for any sweet comments you'd like to leave. Your time and thoughts are truly appreciated. Warm festive wishes to all


Follow on Bloglovin
♥ Follow Me On Bloglovin'

I would also like to enter the following challenges:
Country View Challenges - December 2017 Christmas
A Vintage Journey - Winter Wonderland 
Frilly and Funkie Challenge Blog - Most Memorable Gift
Read More

Tuesday 31 October 2017

Crow's Woes - A Story of A Halloween Raven


Re-edited: Yeeppie!!! I am a Designer Spotlight with this project over at Simon Says Stamp Monday Challenge! Yaaay!!!

Happy Halloween to all!

I haven't blogged for a long while but I've finally been able to find some crafty time and the inspiration came for this Halloween themed project! Just in time to join in the finale of 31 Days of Halloween!

Under a creative spell Asia King


I've decided to alter an old photo frame for this handsome fella. The stamp I used is the Raven Background from Stampendous. I took the inspiration from the JUGS #417 Challenge Photo:


The autumnal colour splatters, the bird theme, feathers...

The frame was first painted with DecoArt's black gesso and then treated with random dollops of alcohol inks in a range of colours.  When the inks dried I applied some Dazzling Mettallics wax in Iced Esspresso to highlight the raised areas, along with a touch of Cherry Red acrylic paint.

Decoart Dazzling Metallics acrylic paint


I also framed the image further with Black Glass Glitter from Stampendous.

Spooky Halloween ornament

At the top I added an ornament cluster with hidden bat wings, mystic medallion and raven's feathers, complemented by a smaller ornament at the bottom with a scull and crossbones. All straight from the pantry essentials for witch's brews and potions... :).


If you'd like to indulge in more Halloween inspiration, do also have a peek at my Halloween lantern and Halloween Witchcraft tag projects. And make sure to check out of the spookylicious projects over at the Stampendous blog with the links to the whole month's worth of Halloween inspiration!


Thank you so much for stopping by and for all your lovely (or terrrrrifying!) comments! Happy Halloween!

Big crafty hugs!

Asia King Blog signature_small

Follow on Bloglovin
♥ Follow Me On Bloglovin'

I would also like to enter the following challenges:
Simon Says Stamp Monday Challenge - All Creatures Great and Small
Simon Says Stamp Wednesday Challenge - Anything Goes
Frilly and Funkie - Trick or Treat (bat wings - treat for a witch)
A Vintage Journey - Crazy for Autumn Colour
Country View Challenges October - Mixed Media With Autumnal Hues 

Read More

Thursday 6 April 2017

Sunflowers In Spring? Why Not?!

Hello Friends! I hope this post will find you well! :). A very warm welcome to my newest readers and the regular followers, too! So happy to see you here!

Can you feel it? Can you smell it? Yes, Spring is finally in the air! Beautiful sunny banks of daffodils, cheerful bunches of tulips, magnolia blooms... aaah, I love this time of year! 


In keeping with the season our Stampendous HQ powers are focusing on all things Spring this week and I wanted to join in, too! Here's a birthday card I made for my Mum and while sunflowers are not normally associated with Spring, I thought these lovely sunny blooms would be a great addition to my delicate springtime lilacs hiding in the background.

Stampendous rubber stamping

I stamped the Lilac and Sunny Vase flowers on the Mixed Media Paper and coloured the images with Inktense pencils. I then die cut the images with the corresponding Sunny Vase and Lilac die sets. I varied the height of the blooms with my trusty 3D Foam Squares from Scrapbook Adhesives by 3L.

For my background and vase I used some papers from 7Dots Studio which I stamped with Scrollwork Leaves and which I embossed with the Dreamweaver Metallic Gold Embossing Paste over the Corner Flourishes stencil. The little tag is from the Sunny Vase stamps set.

Frantage encrusted jewel technique

For the bottom of my vase I sprinkled some flower dust - aka Frantage and (my newly re-discovered loOOOove for) the encrusted jewel technique. I used Bronze Glass Glitter, Spoonful of Rust, Copper Lux Mix and Shabby White Embossing Enamel

papercraft and cardmaking tips

I finished the card with a little butterfly - because I absolutely looove butterflies and always look for an excuse to add one in lol :).

Also sharing today are:

Stampendous Blog
Pam Bray
Louise Healy

I hope you've enjoyed today's post and thank you for all your lovely comments that you may wish to leave (please do!) :). Have a fabulous day!

Big crafty hugs

Asia King Blog signature_small

Follow on Bloglovin
♥ Follow Me On Bloglovin'
Read More
.
Related Posts Plugin for WordPress, Blogger... All content, except where stated (including text, photographs and designs), is copyright of Asia King (Creative Spell Designs). I share my artwork for personal inspiration only. I don’t mind if you copy any of my designs for your own personal use, providing you give me credit by referring to my blog. You may not however copy my designs and photographs for contests and publications entries (online or otherwise) or to sell in either handmade or printed form. You may not copy my designs and photographs for advertising & commercial purposes, without my prior permission. Thank you for your understanding.
MyFreeCopyright.com Registered & Protected

Craft Blogs - BlogCatalog Blog Directory blog button flower Photobucket Crafty Blogs

Let's Tweet!

Powered by Blogger.

© 2011 Under a creative spell, AllRightsReserved.

Designed by ScreenWritersArena