Showing posts with label decoupage. Show all posts

Wednesday, 11 January 2017

A Light-Bulb Moment - A Christmas Wish to All Part 3

Hello Friends! How have the first weeks of 2017 been for you? Mine quite eventful, to say the least, but all in a good way! The Christmas tree and all decorations are gone now but I still have a Christmas/winter project left to share with you. This make is part of the Christmas lights trio I created for the Craft Stamper Magazine and you might have already seen my Altered Christmas Lantern and my Decoupage Christmas Candle. If you haven't,  be sure to check them out!

Altered light bulb mixed media decoupage

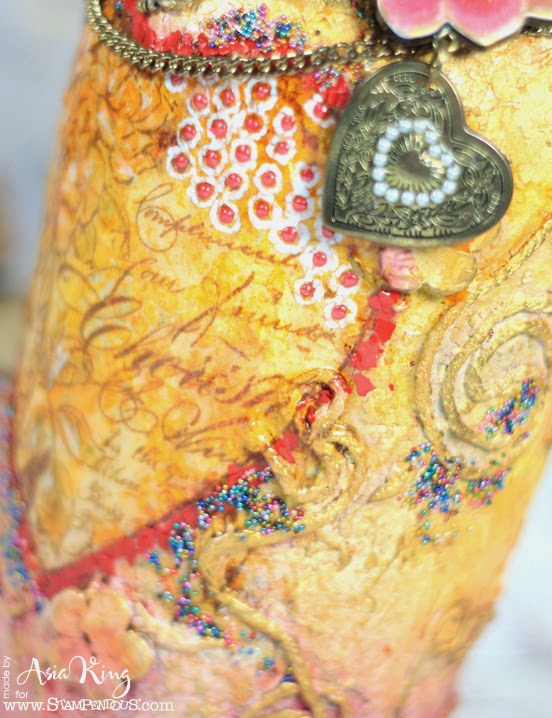
This is an upcycled large light bulb turned into a Christmas bauble ornament. After painting the bulb with Chalky Finish paints,  the image was transferred using a dry decoupage technique with Adhesive Sheets rather than through a traditional way of wet decoupage with decoupage glue. Then I heat embossed it with Kaleidoscope powder and coloured it with Inktense pencils, before sealing it all with matte varnish.

Dry decoupage Christmas bauble


Tim Holtz Sizzix poinsettia die

There's lots more of wintery and snowy inspiration on the Stampendous blog this week. Be sure to check it out!

Supplies:

Stampendous: Snow Queen; Crystal Micro Glitter, Champagne Crushed Glass Glitter; Kaleidoscope Embossing Powder; Spoonful of Pixie Dust
Memento Ink: Tuxedo Black
Scrapbook Adhesives by 3L®: 3D Foam Snowflakes; Adhesive Sheets 4"x6"
DecoArt Americiana Decor ® Chalky Finish: Everlasting; Vintage
DecoArt Snow-Tex, DuraClear Ultra Matte Varnish
Sizzix Tim Holtz Alterations Die: Tattered Poinsettia
Derwent: Inktense Pencils
Large light bulb
Seam binding ribbon
Pearl lace
Cheese cloth
Spray of foam berries
Decorative pins
Tissue paper

Thank you for stopping by and for your lovely comments!

Big hugs

Asia King Blog signature_small

Follow on Bloglovin
♥ Follow Me On Bloglovin'
Read More

Wednesday, 28 December 2016

A Christmas Wish to All - Part 2

Hello Friends! I hope you had an amazing Christmas period, enjoyed together with your family and friends. Ours was lovely, too - spent with family, friends and... a leaking radiator! Not exactly my choice of Christmas entertainment if you ask me but it could've been worse :). We moved into our new home earlier this year and the house is still throwing surprises at us here and there!

As promised, here's the second companion from my Christmas Lights set - in my previous post I shared this Christmas lantern and I have one more item to share :).

I love how church candles can be altered with stamped images - they can easily transform ordinary candles into magical ornaments. I've previously shared on my blog another set of altered Christmas candles and I also have one in my Easter Home Decor set.

Shabby chic DIY handmade Christmas ornament
Stamped images can easily transform ordinary candles into magical ornaments
For my altered candle I stamped this beautiful image onto tissue paper and I coloured it with Spectrum Noir markers first. I also used the alcohol ink markers and an air spritzer to give my Crystal Angel a whimsical look. Then I adhered the image to the candle by gently melting the tissue into the wax.

Alcohol ink markers Spectrum Noir with Air spritzer
Use alcohol ink markers and an air spritzer for a whimsical look
To melt tissue into the wax evenly, wrap the candle tightly with grease-proof paper, carefully heat with a heat gun until the image underneath looks sharper and continue to hold the sheet until the wax cools down.

As a finishing touch, I added a glittered 3D foam snowflake, some handmade poinsettia flowers with glass glitter 3D DODZ centres and some lace and seam binding ribbons.

Sizzix Tim Holtz Tattered Poinsettia cutting die
Add handmade poinsettia flowers, ribbons and lace to create a shabby chic look
Supplies:
Memento Ink: Tuxedo Black
Scrapbook Adhesives by 3L®: 3D Foam Snowflakes; 3D DODZ
Sizzix Tim Holtz Alterations Die: Tattered Poinsettia
Crafters Companion: Spectrum Noir Alcohol Markers
Church candle
Seam binding ribbon
Pearl lace
Cheese cloth
Spray of foam berries
Decorative pins
Tissue paper
Air spritzer tool

I hope you've enjoyed today's post. Thank you for stopping by and for your lovely comments!

Big hugs

Asia King Blog signature_small
I would like to enter the following challenges:
Mixed Media Place - December mood board
Country View Challenges - Christmas
Simon Says Stamp Wednesday Challenge - Make It Sparkle
Fashionable Stamping Challenges - Anything Goes
Mixed Media Monthly Blog Challenge - Merry and Bright


Read More

Sunday, 25 January 2015

Craft And Hobby Association 2015 Project: Mixed Media Dragonflies - Part 2

If you're looking for my Grow Your Blog 2015 Link Party blog post, click HERE.

Hello everyone! Thank you for stopping by today to see the second installment of my Mixed Media Dragonflies CHA ensemble. I'm posting it a little early than originally intended :).

In my first post I shared a Mixed Media Dragonflies Canvas With Adhesive Sheets and today over at Scrapbook Adhesives by 3L I am sharing the remaining items - an altered wooden plaque and an altered mobile phone cover. I would love it, if you found a moment to hop over to the blog to find out all the details how I made these items.

Here are my three pieces together.
 

Here is my altered wooden wall plaque - a shelf for my altered phone cover.


And a couple of close-ups:


Supplies used for the altered wall plaque:

Scrapbook Adhesives by 3L®: Adhesive Sheets - 6x12", DODZ™ - Small, DODZ™ - 3D, Thin 3D Foam Squares - Mix White, 3D Foam Squares - White Mix, 3D Foam Pennants, 3D Foam Keys & 3D Foam Swirls (Donna Salazar with Scrapbook Adhesives by 3L®), 3D Foam Wings, 3D Foam Butterflies

Media: DecoArt Americana Metallic Oyster Pearl and Spa Blue acrylic paints, Prima Color Bloom sprays (Soft Teal, Summer Sky), Tattered Angels Glimmer Mists (Peach Delight, Lemon Zest, Iridescent Gold), texture paste, white gesso 

Other supplies: Tim Holtz Layered Stencil - Gothic, PaperArtsy - Bloom stencil, wooden wall candle holder, printed napkins, various embellishments and findings, paper flowers, buttons. 

Now onto the altered phone cover. I had a used mobile phone cover in my stash and I thought it would make a great notepad, perhaps for keeping phone messages or telephone numbers?


And a few close-ups:


And the inside:


Supplies used for the altered mobile phone case:

Scrapbook Adhesives by 3L®: Adhesive Sheets - 4x6", DODZ™ - Small, DODZ™ - 3D, Thin 3D Foam Squares - Mix White, 3D Foam Squares - White Mix, Crafty Foam Tape - White, Keepsake Envelopes

Other Supplies: Stampendous: Vintage Typewriter & Vintage Press Perfectly Clear stamps, Phone Elements Cling Rubber stamp, phone cover, printed napkins, cheese cloth, various embellishments and findings, paper flowers, buttons

Media: Stampendous Boss Gloss, Stampendous Periwinkle and Aqua embossing powders, DecoArt Americana Metallic Oyster Pearl and Spa Blue acrylic paints, Prima Color Bloom sprays (Soft Teal, Summer Sky), Tattered Angels Glimmer Mists (Peach Delight, Lemon Zest, Black Cherry, Iridescent Gold), Tsukineko StazOn (Jet Black, Blue Hawaii, Midnight Blue, Emerald City), white gesso

I hope you enjoyed the second installment of my mixed media project. Thanks for stopping by and for all your heartwarming comments!

Big crafty hugs

Asia King Blog signature_small

Follow on Bloglovin
♥ Follow Me On Bloglovin'
Read More

Wednesday, 14 January 2015

Craft and Hobby Association 2015 Project: Mixed Media Dragonflies - Part 1


Hello Friends! I hope you are all well and keeping safely away from the strong winds and rain. I have been snuggling indoors, doing a little bit of crafting and also working on a new look for my blog. You know, new year, new hair, new blog design...etc lol. Please bear with me if things look a tad strange for a while - it's still work in progress.

Today over at Scrapbook Adhesives by 3L's blog I am sharing a first installment of a three-piece project I created for their display booth at the CHA 2015. Here is a picture of my ensemble to give you a flavour of what's coming :).

First up - a canvas. I would be delighted if you found a moment to hop over to the blog to read how I created my canvas. My second installment will be shared on January 28th :).

This project is a new take on my dry decoupage technique from the altered mixed media vanity box I shared back in May 2014.


Supplies by Scrapbook Adhesives by 3L®:

Adhesive Sheets - 12x12", DODZ™ - Small, DODZ™ - 3D, Thin 3D Foam Squares - Mix White, 3D Foam Squares - White Mix, Crafty Foam Tape - White, 3D Foam Pennants

Other supplies:

Stampendous Discover Today Perfectly Clear stamps, Stampendous NK Studio Wired Rubber stamp, canvas, printed napkins, various embellishments and findings, paper flowers, buttons, cheese cloth


Media:

Stampendous Boss Gloss, Stampendous Periwinkle and Aqua embossing powders, DecoArt Americana Metallic Oyster Pearl and Spa Blue acrylic paints, Ranger Ink Perfect Pearls (Baby Blue, Petal Pink, Buttercup), Prima Color Bloom sprays (Soft Teal, Summer Sky), Tattered Angels Glimmer Mists (Peach Delight, Lemon Zest, Black Cherry, Iridescent Gold), Gold Cosmic Shimmer Mist, Tsukineko StazOn (Jet Black, Blue Hawaii), white gesso

Thank you for stopping by today and don't forget to pop back on the 28th to see the rest of my CHA assemble! :)

Big crafty hugs


Follow on Bloglovin
♥ Follow Me On Bloglovin'

Challenges for this project:
Simon Says Stamp Monday Challenge - Inky Background
Read More

Saturday, 3 May 2014

Totally Media Mixed - Stampendous And Ice Resin Play


Happy (Inter)National Scrapbooking Day!

First of all may I send my warmest welcome to my newest followers - thank you so much for choosing to join the fun here!

I would also like to welcome you to the Stampendous StampsICE Resin® and Imagine Crafts®/Tsukineko® Blog Hop! You’ll be amazed what we have for you this weekend! During the four days between May 1st and 4th you’ll be treated to some of the most amazing projects with some of the hottest mixed media artists in crafting. And the possibilities for crafting with these great products are truly endless!


We know you’ll want to try this yourself, and to make that easy we’re offering a nice prize package this week! Three lucky winners will receive a package with:

• 2 - Stampendous Perfectly Clear Stamp™ sets with designs sized for jewelry or small project making

• 2 – StazOn™ permanent ink pads by Tsukineko® courtesy of Imagine Crafts® – yummy Ganache and the must-have Jet Black

• 1 – 30ml package of ICE Resin Jeweler’s Grade Self-Doming resin

• 1 – pkg Suzan Lenart Kazmer Art Mechanique Silhouettes in Heart Shape

• 1 – pkg Kristen Robinson Rue Romatique bezel(s) (styles vary). WOW!! You’ll be crafting some awesome jewelry in no time!


My project is an altered mixed media bottle - I seem to be in a bit of a mixed (media) mood at the moment lol.


I begun working on this bottle some time ago, spray painted it cream and never completed it. One of my resolutions this year is to finish the projects I started in the past and this bottle was next on my list :).

My first task was to add lots of texture. For that I spread a generous amount of texture paste around the bottle, varying thickness and finish of the layers.  I added various elements like wooden flowers, string, paper clips and Scarlet Colour Fragments and embedded them in the paste. I left a large area un-decorated to make space for my stamped image.


Once the paste was dry I sponged various DecoArt Americana acrylic paints in horizontal layers. I overlapped the colours and blended the paint to achieve an ombre effect.

After the paint was dry, I stamped my Cherish Heart cling stamp with Saddle Brown StazOn onto a thick tissue paper, backed it up with an Adhesive Sheet and layered it onto my bottle (NB. in case you missed my previous post, I've just made a video tutorial on using the Adhesive Sheets for decoupaging napkins and tissue papers).


I sponged some paint around the heart to blend it in. Next I brushed on a layer of ICE Resin over the heart and edged it with Scarlet Fragments. This helped me keep the resin within the heart area as otherwise it could have run down the sides of the bottle. I secured the bottle in a horizontal position and let it cure. I also randomly brushed any left-over resin into the crevices in the texture and sprinkled it with micro beads.


I added some lovely trims and embellishments from Rue Romantique, which I used to decorate the neck of the bottle, along with a charms necklace I bought ages ago in a car boot sale. I also added a little bezel embellishment with a Fleur de Lis from Santos Angel clear stamp set filled with ICE Resin.


For the top I pressed some gems and Rue Romantique trim into craft clay along with a cherub from a perfume bottle which I rubbed with metallic Rub N Buff paste.


Hopping today:

Stampendous
Asia King (Yours Truly!)

ICE Resin

Imagine Crafts

That's all from me today. Be sure to check out all the fantastic projects shared during this blog hop - I promise you won't be disappointed! To find all the links hop over to these posts here:


Thank you for stopping by and for your lovely comments! Have a wonderful weekend!

Big crafty hugs


Follow on Bloglovin
♥ Follow Me On Bloglovin'

Challenges for this project: 
Simon Says Stamps Wednesday Challenge - Anything Goes
Read More

Thursday, 1 May 2014

You're Amazing Mixed Media Dry Decoupage Box & Video Tutorial


Happy May Day everyone!

Oh my goodness! I haven't been this excited about my project since errr... the Geisha fan in my last post lol :). No, but honestly - I am super excited about this one!

This is my newest DT offering for Scrapbook Adhesives by 3L and I am sharing a full tutorial on my 'dry decoupage' technique. But wait - it's not just any tutorial - it's a video tutorial!

Yes, you heard me correctly - I've finally made my second crafty movie! It was a bit of a bumpy ride this time but I hope it will get easier in the future :).


So.... You are all cordially invited to view my newest video when you have a moment to spare. Or two moments, perhaps :).

To see the video, hop over here.


Supplies:
Stampendous Ice Blue Micro Glitter and Stamps Angel Wings Stack Art & Quotes; Americana DecoArt acrylic paints (Pink Chiffon, Spa Blue, Tropical Blue, White) and Medieval Iron Accent Stencil; Faber-Castell Whipped Spackle; Tsukineko Blue Hawaii StazOn;
wooden vanity box, decorative napkins, flowers and embellishments.

Big crafty excited hugs!


Follow on Bloglovin
♥ Follow Me On Bloglovin'

Challenges for this project: 
Simon Says Stamp Wednesday Challenge - Anything Goes
Country View Crafts #15 - Nature's Glories
Read More

Thursday, 24 April 2014

Summer On My Mind - with Stampendous and Dreamweaver


Hello everyone and welcome to the Stampendous and Dreamweaver Blog Play - Day 4. Tomorrow is the big finale so do make sure to pop back! This week we've been dreaming of stencils and stamps - a fabulous combination, if you ask me!

My biggest highlight of the week is the set we chose to play with - the Blossom Beauty stamps and the matching Cutting Die set. I absolutely love this new collection and the matching dies, they make crafting so much quicker and so much more enjoyable! We also have some fun free hair templates for your Blossom Beauty that you can download here. Both teams have really rocked this set so do check out all the amazing projects shared this week.


Oh and of course - there are prizes, too! There will be three bundles for grabs - and the teaser picture is below. All you have to do is to comment on the posts shared this week as part of the Dream-pendous play. The more you comment, the bigger chance you have of winning!


For my inspiration today I am sharing a calendar journal page. Now, before you ask why it's an August one... 


At the beginning of the year I made a resolution (one of many!) to finish all projects I started in the past and never completed. Many moons ago I began creating a calendar where I could keep track of all the birthdays and anniversaries I need to remember about. The inspiration behind it was the 'challenge' started by Kate Crane from The Kathryn Wheel. So far I've done April, JuneJuly and October so I only have a few months left to do...LOL. I chose to make the August page - I suppose I already have summer on my mind!


The background for my page was created with the DecoArt Americana acrylic paints smooshed around on the Creative Palette Monoprinting Plate. To add depth I layered lots of stamping with Mish Mesh, Grunge and Wired stamp plates - these are perfect for mixed media backgrounds.

I also fussy cut some lovely images from a napkin and added them to the page. To add texture the images were covered with Translucent Embossing Paste through sequin waste and sprinkled with a touch of Crystal Micro Glitter.


Next I sponged lovely neon inks all over the page through the Summer stencil. Then I was ready to stamp my Blossom Beauty. I coloured her with PITT pens  and aquarell pencils. I also gave her a little hat which I made using the Hydrangea Garden stamp and the Cutting Die set.


For the August banner I used some old paint swatch cards stamped with the Vintage Lowercase stamps and pins from the Smash Notes clear set.


The days were punched from Crafty Individual papers.

Additional supplies I used:
Scrapbook Adhesives by 3L - Mounting SquaresMyStik® Permanent Strips, Adhesive Sheets
Tsukineko (Imagine Crafts) - Jet Black and Blue Hawaii StazOn Minis, Memento Grape Jelly, Radiant Neons - Electric Blue, Purple and Pink
Staedtler - ergosoft aquarell pencils
Faber- Castell - India Ink PITT Artist Pens


I hope you enjoyed my offering today. There is still more inspiration today for your viewing pleasure so make sure to check out the following:

Asia King (that's me!)

Thank you for stopping by and for all your lovely comments. See you again tomorrow!

Witam wszystkich bardzo serdecznie i zapraszam na blogowy hop z udzialem firm Stampendous i Dreamweaver. Na uczestnikow czekaja niesamowite inspiracje a jesli posiadasz adres kontaktowy w USA, masz szanse zdobyc jedna z 3 nagrod przeznaczonych dla komentujacych.

Jako inspiracje przygotowalam strone do kalendarza w stylu art journaling. Powyzej znajduje sie lista uzytych materialow. Dziekuje za wizyte i za pozostawione komentarze :).

Big hugs


Follow on Bloglovin
♥ Follow Me On Bloglovin'

Challenges for this project:
Simon Says Stamp Monday Challenge - Big Stamp
Craftowy Ogrodek - Wyzwanie z UHK


Read More

Wednesday, 5 March 2014

Coffee Time with Stampendous and Faber-Castell


Edited: Yay! My wall plaque has been spotlighted at the Fashionable Stamping Challenges #67! :)

Hello Friends! It's coffee time in my craft room! Well, actually it's always coffee time for me :) but today I would like to share a wall plaque I made to capture my coffee-licious obsession lol.

While I'm sipping my coffee, I might as well tell you about this fabulous colour play we're having all week with Stampendous and Faber-CastellAnd to celebrate this happy occasion there will be some delicious prizes for three lucky commenters who'll leave some love on the participating entries throughout the week up to the 9th March. The more you comment, the bigger your chance to win!

To create my wall decor plaque I played with my all time favourite - napkin art. And I also used one of my favourite napkins in my collection. But this time, I tried something new - let's call it a dry decoupage :). 


Instead of using a regular wet decoupage glue, I covered a round piece of a ply wood with a 6x12" Adhesive Sheet. I carefully positioned the napkin over the adhesive then used a wooden spoon to burnish the piece.


I used the redundant yellow cover sheet as a burnishing 'platform', this way I avoided the risk of any accidental tears. I was super happy with the result - no wrinkles on my napkin transfer!


Then I stamped the Cling Glance image (this is such a beautiful stamp!) on a scrap paper and cut out the outline to create a mask. I dabbed some light cream paint over the area to prepare it for stamping.

Once it was dry, I stamped the Glance image with Sparrow Mix'd Media Inx and coloured the image with the Art GRIP Aquarelles. I added some detailing to the hair with Oil Pastel Crayons. I kept the strokes mostly unblended.

Next, using Coffee Archival ink I stamped the coffee splatters and coffee beans around the edges - Perfectly Clear Stamps: Coffee Mug and Coffee Talk. Finally I rubbed in a touch of Frayed Burlap DI and Chocolate Gelatos along the outer edge for a distressed look and sprayed my plaque with Krylon lacquer to seal it all in.

There is a lot of fantastic inspiration being shared this week so do make sure to check it out. Here's who's playing today:


Asia King (that's me!)

Thank you for visiting and happy hopping!

Big crafty hugs


Follow on Bloglovin
♥ Follow Me On Bloglovin'

Challenges for this project:
Simon Says Stamp Monday Challenge - Tick Tock
Fashionable Stamping Challenges - Anything Goes
Rhedd and Rosie's Challenge Blog #27 - Anything but a card

Read More
.
Related Posts Plugin for WordPress, Blogger... All content, except where stated (including text, photographs and designs), is copyright of Asia King (Creative Spell Designs). I share my artwork for personal inspiration only. I don’t mind if you copy any of my designs for your own personal use, providing you give me credit by referring to my blog. You may not however copy my designs and photographs for contests and publications entries (online or otherwise) or to sell in either handmade or printed form. You may not copy my designs and photographs for advertising & commercial purposes, without my prior permission. Thank you for your understanding.
MyFreeCopyright.com Registered & Protected

Craft Blogs - BlogCatalog Blog Directory blog button flower Photobucket Crafty Blogs

Let's Tweet!

Powered by Blogger.

© 2011 Under a creative spell, AllRightsReserved.

Designed by ScreenWritersArena