Showing posts with label nautical. Show all posts

Sunday, 13 December 2015

Seashell Jar and Happy Birthday, Laura!

Hello Friends! It's a very special day today - our Stampendoulicious Fairy Stamp Mother, fantastic DT coordinator, talented crafter and most importantly amazing friend Laura Weed is celebrating her birthday! So the Stampendous gang are hosting a birthday hop today to show how much we love our Fairy Stamp Mother! 

I hope you will join me and my DT Sisters to wish Laura a very happy birthday - we'd love it if you hopped along to see what inspiration we're sharing today for this occasion. It may be a welcomed break from Christmas cards lol :-). Here's who's hopping today:


I'm sharing a cute nautical card I made a while ago :).

Supplies

From Stampendous: 

Seashell Jar 
Near the Sea 
Andy Skinner Cling Industrial Set 
Shabby Blue Embossing Enamel 
Aged Ivory Embossing Enamel 
Golden Sand Embossing Powder 
Pop Up Die Set 
Taupe Color Fragments 
Jumbo Perfectly Clear™ Acrylic Handle 
Mixed Media White Paper 

Plus: 
Memento™ Tuxedo Black Ink by Tsukineko® 
Cardstock by Bazzill Basics Paper® 
Ribbon by May Arts 

Adhesives by Scrapbook Adhesives by 3L®: E-Z Runner® Permanent Strips, Adhesive Sheets 4x6", 3D Foam Squares - White 

Spectrum Noir Alcohol Markers, Evergreen & Tea Dye Distress Inks (Ranger Ink), Glossy Accents, burlap panel, charms and decorative pins, Liquid Pearls, adhesive pearls Spellbinders Labels One
Instructions:
1. Create a 6x6" card blank from turquoise cardstock
2. Using scraps of white card repeatedly stamp crackle pattern from the Industrial set with Evergreen ink. Cut the cards into strips of varying width and ink up the edges.
3. Arrange the strips to resemble wood planks and adhere to the card leaving a 1/16" border (as shown). Add a piece of burlap positioning it diagonally.
4. Stamp the Sea Shell Jar in black onto Mixed Media paper and color in (I used Spectrum Noir markers).
5. Using encrusted jewel technique melt in Shabby Blue, Aged Ivory, Golden Sand and Taupe Color 6. Fragments into the background.
7. Die cut your stamped panel with Labels One die and adhere to a mat 1/16" bigger than the stamped panel (use the die as a template for fussy cutting).
8. Cover the jar with Glossy Accents and allow to dry fully. Adhere the panel to the card over 3D Foam Squares.
9. Stamp the Near The Sea sentiment onto white card and die cut using a bezel/label die from the Pop Up Die Set. Ink the edges.
10. Finish the card with a ribbon bow, pearls, charms and decorative pins.


Happy birthday Miss Laura! Hope you have an amazing day!


Asia King Blog signature_small

Follow on Bloglovin
♥ Follow Me On Bloglovin'
Read More

Saturday, 3 October 2015

What, of This Goldfish, Would You Wish? Happy World Card Making Day!

Hello Friends! Thank you so much for the lovely comments on my previous post with this Grungy Birthday Card.

Today I am back to say "Happy World Card Making Day to all my paper crafting buddies"!

Can you imagine what the world would be like without handmade cards? I certainly can't! But if anything, it would be a very sad place, I think. So if we can have a special day to celebrate card making - I'm all for it!

To join the celebrations the Stampendous HQ have prepared a collection of the DT's fave cards that they've made & shared this year so far. The card I chose as my favourite of the year was this Sunflower Wedding Card. I adoooore sunflowers so this card kind of fell into the faves bag by default lol. Oh well!

Be sure to check out my DT Sisters' picks - you will be amazed to see what a wonderful and talented bunch they are!

But today I also have another card to share :). The theme for this card was inspired by the old Russian fairy tale The Tale of the Fisherman and the Fish. 

The tale is about a fisherman who manages to catch a "Golden Fish" which promises to fulfill any wish of his in exchange for its freedom. I was quite surprised to find out that my British friends weren't familiar with this tale - as it's certainly a well known 'classic' in Poland :). 


With this card I decided to give my Golden Fish a nice fishbowl to live in. The fishbowl is actually a shaker made with 3D Foam Creative Sheets and acetate. Inside the bowl I have some lovely textured bubbles, corals and shells, mica fragments and sequins.

Supplies I used:

Stampendous:
Cling Goldfish Pair
Cling Coral Tree
Cling Jumbo Spider Mum (retired)
Cling Build a Bouquet Set
Stack Art Cling Angel Wings Kit
Teal Mica Fragments
Jumbo Perfectly Clear™ Acrylic Handle

Scrapbook Adhesives by 3L®:
3D Pennants, DODZ™ – 3D, E-Z Runner® Permanent Strips, 3D Foam Creative Sheets, Adhesive Sheets 4×6″, 3D Thin Foam Squares – White

Plus:
Cardstock by Bazzill Basics Paper®; Paper: Prima Romance (Annalee Collection)
acetate, ribbon flowers, burlap, buttons chipboard alphas; ARMOUR Over’n’Over Sparkle Borders stencil, Spellbinders Labels Eighteen

Media:
Evergreen Bough & Wild Honey Distress Inks;
DecoArt: Snowtex, Americana Bright Yellow & Light Buttermilk paints;
Faber – Castell Whipped Spackle
Spectrum Noir alcohol markers: GT2, IB2, CG2, DG1, DG2, BG2, BG5, GB8, GB11, CT2, CT4, OR2, TB1, IG1, Blender pen
Liquid Pearls


I hope you enjoyed my today's offering - I would love to know what you think! If you'd like to make/share a wish, too, please do so - you never know, it may come true! :)

Have a wonderful 'cardmakingilicious' weekend!

Big crafty hugs

Asia King Blog signature_small

Follow on Bloglovin
♥ Follow Me On Bloglovin'

Challenges I'm entering with this card:
The Craft Barn #27 - Ocean/Fish
Country View Challenges #32 - Add some texture
Mixed Media Place Exercise #12 - Proverbs and Sayings
Fashionable Stamping Challenges #103 - Words
Simon Says Wednesday Challenge - Anything Goes
Read More

Wednesday, 1 July 2015

Near The Sea - Stampendous And May Arts Big Play Time!

Hello Friends! I am so delighted to see you visiting today because oh boy, we've got so much in store for you!

Prepare yourselves for heaps of inspiration, crafty tips and AMAZING prizes - all courtesy of two fantastic blog hops going on this week.

As always, to take part in the prize draws make sure to visit all participating blogs and leave some love! Actually leave lots of love cuz it makes us really happy! :).

First up is the Spellbinders Partner Blog Hop. It’s summer time and we are hopping together with some fabulous companies in the Summer Road Trip Partner Hop with Spellbinders.


Today's featured partners are:
Canvas Corp
DCWV 

Spellbinders is giving away some spectacular prizes during the hop! There will be three daily prizes and one grand prize! See the official contest rules here.

Better still! You know how much Stampendous people love their fans, so they will have some fun prizes on their blog as well. Three lucky winners will win one $20 Rewards Cards to go shopping on their website. To be eligible, you must be a US or Canadian resident, comment on their blog and that of each Stampendous designer’s blog posts each day of the hop and tell us in what state you live. Stampendous Official Contest Rules apply.

If that wasn't enough, our Australian friends will have a chance at a prize from our distributor down under, The Stencil Specialists, for commenting on Stampendous blog and designers blogs during the hop. Wow! Please make sure you add the region you live in when you comment.

Here's the full list of Stampendous DT blogs playing in this blog hop:

Featured Designer – Tenia Nelson
Featured Designer – Lyn Bernatovich
Asia King (that's me!)

But that's not all! Be sure to check out the Scrapbook Adhesives by 3L®'s blog as there will be more prizes to be won there - if that's not early Christmas, then I don't know what is! :)

You still with me? Good, because there's more fabulousity coming!

Stampendous is also hopping this week with May Arts ribbon specialists! Amazing or what?! Again, three lucky US residents and one Aussie crafter will see some fabby prizes going their way. Same rules apply to be eligible to win - leave some love on the participating designers' blogs and make sure to let us know in your comments where you live :).

Blogs taking part in the May Arts hop today:

OK. I think I've kept you waiting long enough. I can finally reveal what you've been so patiently waiting for LOL - my today's inspirational offering! What a better way to celebrate summer than with  a breeze in the sails and a nautical theme! :)

Near the sea nautical vintage card by Asia King

Supplies:
May Arts: Paper Cord Ribbon in pink, light blue and ivory

Scrapbook Adhesives by 3L®: Adhesive Sheets 4x6", MyStik® Permanent Strips, 3D Foam Squares - White, 3D Foam Pennants, DODZ™ - 3D

Spellbinders: Nested Lacey Pennants, Labels Eighteen

Plus: Cardstock by Bazzill Basics Paper®
Inktense Pencils (Derwent) - Dark Chocolate, Saddle Brown, Bark, Sea Blue, Willow, Iron Blue, Iron Green
Coffee Archival Ink and Frayed Burlap Distress Ink (Ranger Ink), Gothic Purple StazOn Mini Ink by Tsukineko®
Patterned papers (Vintage Experience, the Works), watercolour paper, metal ornate corners, burlap & canvas flower, self adhesive pearls, eyelets, decorative pins and brads.

Instructions:
1. Create a kraft card blank with A5 card front.
2. Using pink cardstock prepare a mat 1/16 inch on each side smaller than the card front. Adhere to the base with MyStik®.
3. Trim a panel from patterned paper 1/16 inch on each side smaller than the mat. Ink the edges and adhere to the base with MyStik®.
4. Dab embossing ink onto metal corners with Boss Gloss and sprinkle with Aged Ivory Enamel. Shake off the excess and heat emboss.
5. Adhere the corners to the card with Adhesive Sheets in the top and bottom right corners as shown.
6. Die cut a large Lacey Pennant from coordinated papers and adhere to the card, allowing the top left corner to hang off the card.
7. Create a centre panel from patterned papers, pink and beige cardstock (use the photo for approximate proportions) and adhere to the card using 3D Foam Squares. Add pearls along the right side as shown.
8. Stamp Wind In Sails onto watercolour paper with Coffee Ink and colour with Inktense pencils. Die cut and emboss with Labels 18 die. Adhere to the card with 3D Foam Squares.
9. Stamp Near The Sea sentiment on a scrap of kraft card in purple ink. Trim and form in your hands to create a small wavy banner. Adhere to the card.
10. Cover the 3D Foam Pennants with matching papers, add eyelets and suede twine and layer at the top of the card as shown.
11. Finish the card with a canvas flower and paper twine bows adhered with DODZ™ - 3D. Add final touches with brads and decorative pins.

If you are new to to my blog - please feel free to stay a bit longer and check out my other creations. If any of them sparked an idea for your next project, make sure to click the 'Follow Me' button in my sidebar to stay up to date with my future crafty shenanigans :). Also, do let me know how I can find you and visit you back.

We can also connect on Instagram, Pinterest, Twitter or Facebook!

That's all from me for now - I hope you enjoyed my today's offering. Thank you for all your kind and heart warming comments. Enjoy the creative ride and 'see' you again soon!

Big crafty hugs

Asia King Blog signature_small

Follow on Bloglovin
♥ Follow Me On Bloglovin'
Read More

Wednesday, 17 September 2014

Add a Little Dazzle to Stampendous And Make It Beautiful


Hello Lovely Bloggers! I am so happy that you stopped by today - as we have a real treat for you in store!
Blog_header_add_a_little_dazzle 

This week the Design Teams at Stampendous! and Add a Little Dazzle Craft Metal Sheets are hopping together to inspire you and temp you to try out some cool new techniques and products! 

If you missed the earlier posts, here are the links for you for MONDAY and TUESDAY. The team over at Add a Little Dazzle has even created a special pack featuring the metals from this blog hop and you can find it here - Add A Little Dazzle Stampendous Hop Special

And we know you'd love to win some goodies, too! So we're giving away three prize packages this week for comments on the blogs. A nice package of Metal Sheets, Stamps and Cutting Dies - life just doesn't get any better than this, does it? lol :-).

  Prize Package from Add a Little Dazzle 

Now onto my offering :). Earlier this summer I collected some sea shells at the beach in Brighton and I was really keen to make something with them. I love all things nautical and can never pass on an opportunity to pick up shells or pebbles whenever I'm by the sea.

And when I saw this frame in a charity shop I thought it would make a perfect setting for my shells. It had raised edges all around, which would work as a border for my 'shell mosaic'.

This is what the frame looked like before...


After I painted the frame with DecoArt acrylic paint I laid out my shells ready for setting in. As I didn't have any fancy mosaic stuff I raided my hubby's shed and found some Polyfilla. I spread generous dollops of the filler within the frame's recess, one dollop at a time, and just pushed the shells in.


Before the filler was dry I brushed on some Pearl-Ex powders and set it aside to harden. I wasn't sure how it was going to turn out but it worked perfectly. The shells were safely embedded in the frame :). Finally, I dry brushed gesso over the coloured parts, wiping the excess as I went, to create a washed out look.


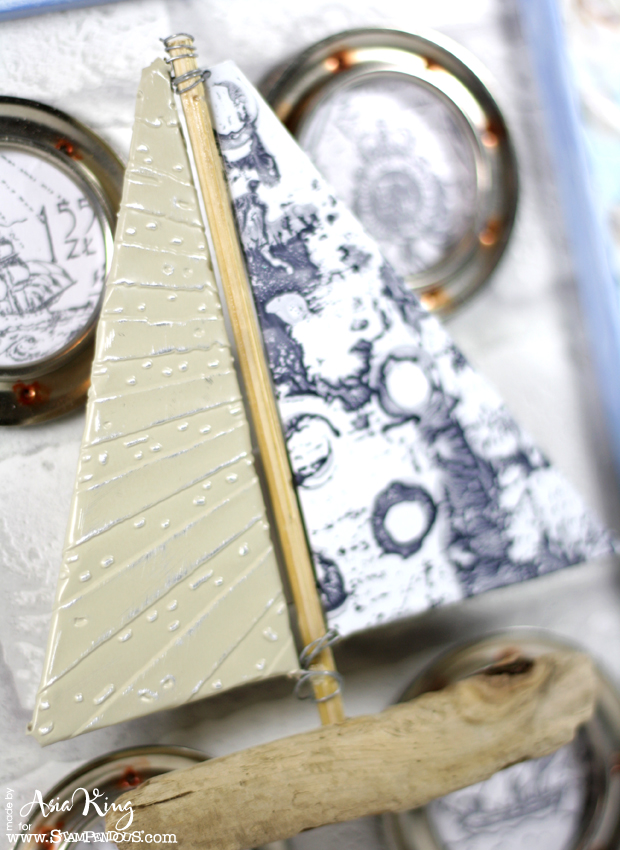
I wanted to carry on with my nautical theme so I stamped Ship Elements and Navigateur onto white card with Cloudy Sky StazOn. Then I adhered some eyelets (saved from my old curtains) over the images to create ship's portholes. To add rust around the 'fixing bolts' I used Spectrum Noir OR2 marker, softened with alcohol ink blending solution.

And then I stalled... I had to put this frame aside for a while to let it 'mature' as I wasn't happy with the result. It was missing something... the oomph just wasn't there.

The inspiration how to finish it came unexpectedly when I stumbled upon this post on Jolanna's blog Miedzy ziemia a niebem (Between earth and heaven). I knew then I wanted to add a sail boat to the frame as my focal point.


And I knew that the fabulous metal sheets for Add a Little Dazzle would work with my metal portholes beautifully :). To create the boat I used a piece of drift wood and the sail came from a paper mache boat I bought at Hobbycraft.


To decorate the sails I cut a piece of Precious Pearl and Wondrous White metal sheets. I stamped the pattern from the NK Studio Grunge set onto the white sheet using Cloudy Sky StazOn. The pearl sheet was embossed with Tim Holtz Rays Texture Fades folder and I lightly sanded the raised parts. Then I simply wrapped the sheets over the sails - no adhesive was required as they as stayed firmly in place.


To fix the boat to the background I used a double sandwich of foam board scraps and Crafty Foam Tape.

Do check out the other terrific projects and leave us your comments! The designers so appreciate when you comment on their blogs. Thanks for hopping with us! Here's who is playing today:


Asia King (yours truly!)


Thank you for stopping by and for all your lovely comments! Have a fabulously crafty week!

Big crafty hugs


Follow on Bloglovin
♥ Follow Me On Bloglovin'

Challenges for this project:
Country View Crafts September - Nautical
Rhedd's Creative Spirit September - Anything Goes
Simon Says Monday Challenge - Rock the Techniques
Read More

Friday, 1 August 2014

You Are My Anchor - Vintage Nautical Card Tutorial And a Giveaway!


Hello everyone and oh boy, I am sooo happy (quite overwhelmed, really!) to see so many new friends joining my blog! Thank you so much from the bottom of my heart! 

In case you've missed my Monday's post, this card was my offering for this week's blog collaboration of two amazing companies. The Design Teams at Scrapbook Adhesives by 3L and Graphic 45 have been playing together to spoil you with a whole week of great inspiration and amazing prizes. To find out more, hop over here!

As promised, I am back today with a tutorial for the nautical anniversary card I shared. And if you keep reading on, you will also see that I have a little 'thank you' surprise for my 'tutorial survivors' lol. 

Ok, let's get started with the tutorial, shall we?

1. Prepare your card blank from kraft cardstock and a selection of background panels and elements from the By The Sea and Place in Time paper collections. Distress the edges with Vintage Photo distress ink and a paper distresser. Make some bigger tears in a few places to show the background fabric scraps.


2. Add some stamping using Stampendous stamps (Loving Messages) and StazOn Midnight blue ink. Cut a few small pieces of burlap fabric. Arrange the elements until you are happy with the layout. 

TIP: I always keep my phone handy to take a quick snap. This way I can refer to my planned layout during the assembling stage, in case I forget how I wanted to arrange the elements :).


3.  Adhere your burlap scraps to the back of your biggest background panel with E-Z Runner® Permanent Strips, making sure to leave some fabric showing outside the edges. Pull some treads out for a tattered look.


4. Run your E-Z Runner® Permanent Strips along all edges of the panel and adhere it to the card blank. Repeat with the smaller background elements and attach them to the card.


5. To adhere flat metal tags and fabric embellishments use Adhesive Sheets.


6. Using the White Crafty Foam Tape and E-Z Runner® Permanent Strips
adhere the remaining background elements, varying the layer heights with additional foam adhesive.


7. Continue to build the layers.


8. Fill a small vial bottle with torn strips of papers and a mixture of Stampendous Frantage powders, glitters, mica fragments and sequins.

TIP: I always keep my leftover powders, glitters and fragments from the encrusted jewel technique in a small container - they come very handy in small embellishment bottles.


9. Wrap the bottle with a small rope embellishment tied in a sailor's knot and secure with DODZ™ - 3D.


TIP: I saved my knots from another project (you can read about it here) but you can easily create them yourself - you can find some cool examples and instructions here

10. Secure the bottle to the card with a handful of DODZ™ - 3D. To cover any adhesive showing tuck in some cheese cloth - this will also add a nice nautical touch.


11. Add a few photo corners from Creative Photo Corners - Mix Pack to imitate beach huts. Layer the sentiment panel over them, leaving only the 'roofs' showing.


12. Weave a nautical ribbon bow through a big ship's wheel brad embellishment and secure to the card.


13. Use the ribbon to cover a handful of 3D Foam Pennants to create a nautical banner, do not peal the back protective sheet yet. Punch a hole at the top left corner of each pennant and weave through a red cord. Peal of the back sheets and layer each pennant onto the card over the previous one.


14. Add a few blue and turquoise sequins to imitate water droplets. Secure with DODZ™ - Small.


And that's it! You can also use the left over pieces and scraps to decorate the inside of the card, like I've done it here :).


***********

Now, something you've all been waiting for! lol :) Giveaway time! Scrapbook Adhesives by 3L have very kindly offered a $25 shopping spree to one of my blog followers - how awesome is that? Imagine the delight in browsing all the fabulous photo corners, designer shapes, adhesive dispensers and so much more...!


All you have to do to enter the giveaway is to follow my blog, comment on this post and enter into the drawing using the Rafflecopter app below. There are also additional ways to gain more entries so have fun and good luck!

The giveaway will be open until midnight on Sunday 10th August 2014 BST and the winner will be announced shortly after.
a Rafflecopter giveaway

Thank you for stopping by today and have a wonderfully crafty weekend!

Big crafty hugs


Follow on Bloglovin
♥ Follow Me On Bloglovin'
Read More

Monday, 28 July 2014

You Are My Anchor - Scrapbook Adhesives by 3L and Graphic 45 Blog Hop - Day 1


Hello everyone! I am really REALLY excited today! 

Well, ok, it's Monday, not my favourite day of the week but I am soooo going to make it much sweeter for you! How, you ask? Read on to find out!


Witajcie kochani! Bardzo dziękuję za odwiedziny w ten poniedziałkowy poranek! Dzisiejszy post będzie super radosny. Nie tylko dlatego, że karteczka, którą się chwalę dzisiaj została przygotowana dla mojej drugiej połowy z okazji naszej piątej rocznicy ślubu :). 

Ale również dlatego, że dwie rewelacyjne firmy Scrapbook Adhesives by 3L i Graphic 45 połączą scrapowe siły podczas kilkudniowego blog hopa. Oczywiście będą super inspiracje! Oczywiście będą również nagrody! Co należy zrobić aby wziąć udział? Wystarczy pozostawić komentarze na blogach biorących udział w zabawie, poprzez Instagram lub na Facebooku i potwierdzić udział poprzez aplikację Rafflecopter (gadżet poniżej na końcu posta). Pozostałe blogi biorące udział znajdziecie tutaj i tutaj.

Ale to jeszcze nie koniec! Ja również mam od siebie małą niespodziankę dla obserwatorów mojego bloga! Wraz z dzisiejszą kartką przygotowałam również kurs krok po kroku, który ukaże się na moim blogu w piątek. Serdecznie zapraszam do odwiedzin w piątek, gdzie oprócz  kursu będą też słodkości sponsorowane przez Scrapbook Adhesives by 3L -  $25 do wydania na zakupy online w Scrapbook Adhesives by 3L!!!  Powodzenia!


This week Scrapbook Adhesives by 3L and Graphic 45 have joined their crafty powers together in a long week blog hop. Of course there will be loads of fantastic inspiration. And of course there will be prizes! To join the fun just visit the participating blogs, leave some love and enter through the Rafflecopter app (widget at the bottom of the post)! If you get lost, you can also find all the links and information HERE and HERE.

Additional entries are available by commenting on our Instagram Page, be sure to tell us your profile name on the Rafflecopter app. 


You can also enter a third time via Facebook. Either click through the Rafflecopter app to comment on our Facebook page, or click on the Giveaway tab on our Facebook page itself. 

Each day there will be 2-3 new blogs to visit, and you can enter each day! 

Be sure to also visit Graphic 45 to enter their drawings too! 
For my inspiration I prepared a card I made for my DH as we've just celebrated our 5th wedding anniversary :-).


For my card I used the beautiful papers from the By The Sea and Place in Time collections. My hubby loves all things nautical, probably because he was born in a house right on the Pendine Sands (in Wales) and he lived with his parents in Eastbourne for many years.


If you have a closer look, the papers actually feature a lighthouse from Beachy Head in Eastbourne - how cool is that? The lighthouse is now red & white but I couldn't be happier to see that image in the collection. Below is a picture of me (a couple-ahem-ish years ago) with the Beachy Head lighthouse in the background - such a magical place, isn't it?


For my card I used White Crafty Foam Tape, 3D Foam PennantsE-Z Runner® Permanent Strips, Adhesive Sheets, Creative Photo Corners - Mix PackDODZ™ - Small and DODZ™ - 3D.

Don't you think those Photo Corners look like little cute beach huts?


I used various fabrics: burlap, cheese cloth and a really cool ribbon I bought some time ago at a flea market in Ghent, Belgium. 

I added some stamping with Stampendous stamps (Loving Messages) and StazOn Midnight blue ink.


I also added a 'message in a bottle' with strips of papers, sequins, mica fragments, glitters and powders from Stampendous Fran-tage lines. It's difficult to photograph it but it looks like it has all the sparkliness of the sea captured within it :).


The rope on the bottle is tied in a buntline hitch knot as per the metal plaque underneath. I saved these from a picture frame I altered a while ago.


I also decorated the inside of the card and I added some stamping (Stampendous Queen Bee).  


I've also prepared a full tutorial for my card which you will be able to see on my blog on Friday 1st August. So please come back, as I will also have a small surprise for my blog followers hidden within my tutorial post :). Scrapbook Adhesives by 3L have very kindly given me the opportunity to treat one of you lucky crafters to a $25 shopping spree on the website - yaaaay!

I hope you've enjoyed reading about my project and if you have, I'd be delighted if you joined to follow my blog :). Do let me know your blog address so I can return the kindness!

Thank you for all your lovely comments and happy hopping! 


Blogging today:
Asia King (yours truly!)

a Rafflecopter giveaway
Big crafty hugs


Follow on Bloglovin
♥ Follow Me On Bloglovin'
Challenges for this card:
Live and Love Crafts July - By The Sea
Frilly and Funkie - Cool Water
Simon Says Stamp Monday Challenge - J is for... July
Read More
.
Related Posts Plugin for WordPress, Blogger... All content, except where stated (including text, photographs and designs), is copyright of Asia King (Creative Spell Designs). I share my artwork for personal inspiration only. I don’t mind if you copy any of my designs for your own personal use, providing you give me credit by referring to my blog. You may not however copy my designs and photographs for contests and publications entries (online or otherwise) or to sell in either handmade or printed form. You may not copy my designs and photographs for advertising & commercial purposes, without my prior permission. Thank you for your understanding.
MyFreeCopyright.com Registered & Protected

Craft Blogs - BlogCatalog Blog Directory blog button flower Photobucket Crafty Blogs

Let's Tweet!

Powered by Blogger.

© 2011 Under a creative spell, AllRightsReserved.

Designed by ScreenWritersArena