Showing posts with label inktense. Show all posts

Thursday, 6 April 2017

Sunflowers In Spring? Why Not?!

Hello Friends! I hope this post will find you well! :). A very warm welcome to my newest readers and the regular followers, too! So happy to see you here!

Can you feel it? Can you smell it? Yes, Spring is finally in the air! Beautiful sunny banks of daffodils, cheerful bunches of tulips, magnolia blooms... aaah, I love this time of year! 


In keeping with the season our Stampendous HQ powers are focusing on all things Spring this week and I wanted to join in, too! Here's a birthday card I made for my Mum and while sunflowers are not normally associated with Spring, I thought these lovely sunny blooms would be a great addition to my delicate springtime lilacs hiding in the background.

Stampendous rubber stamping

I stamped the Lilac and Sunny Vase flowers on the Mixed Media Paper and coloured the images with Inktense pencils. I then die cut the images with the corresponding Sunny Vase and Lilac die sets. I varied the height of the blooms with my trusty 3D Foam Squares from Scrapbook Adhesives by 3L.

For my background and vase I used some papers from 7Dots Studio which I stamped with Scrollwork Leaves and which I embossed with the Dreamweaver Metallic Gold Embossing Paste over the Corner Flourishes stencil. The little tag is from the Sunny Vase stamps set.

Frantage encrusted jewel technique

For the bottom of my vase I sprinkled some flower dust - aka Frantage and (my newly re-discovered loOOOove for) the encrusted jewel technique. I used Bronze Glass Glitter, Spoonful of Rust, Copper Lux Mix and Shabby White Embossing Enamel

papercraft and cardmaking tips

I finished the card with a little butterfly - because I absolutely looove butterflies and always look for an excuse to add one in lol :).

Also sharing today are:

Stampendous Blog
Pam Bray
Louise Healy

I hope you've enjoyed today's post and thank you for all your lovely comments that you may wish to leave (please do!) :). Have a fabulous day!

Big crafty hugs

Asia King Blog signature_small

Follow on Bloglovin
♥ Follow Me On Bloglovin'
Read More

Wednesday, 11 January 2017

A Light-Bulb Moment - A Christmas Wish to All Part 3

Hello Friends! How have the first weeks of 2017 been for you? Mine quite eventful, to say the least, but all in a good way! The Christmas tree and all decorations are gone now but I still have a Christmas/winter project left to share with you. This make is part of the Christmas lights trio I created for the Craft Stamper Magazine and you might have already seen my Altered Christmas Lantern and my Decoupage Christmas Candle. If you haven't,  be sure to check them out!

Altered light bulb mixed media decoupage

This is an upcycled large light bulb turned into a Christmas bauble ornament. After painting the bulb with Chalky Finish paints,  the image was transferred using a dry decoupage technique with Adhesive Sheets rather than through a traditional way of wet decoupage with decoupage glue. Then I heat embossed it with Kaleidoscope powder and coloured it with Inktense pencils, before sealing it all with matte varnish.

Dry decoupage Christmas bauble


Tim Holtz Sizzix poinsettia die

There's lots more of wintery and snowy inspiration on the Stampendous blog this week. Be sure to check it out!

Supplies:

Stampendous: Snow Queen; Crystal Micro Glitter, Champagne Crushed Glass Glitter; Kaleidoscope Embossing Powder; Spoonful of Pixie Dust
Memento Ink: Tuxedo Black
Scrapbook Adhesives by 3L®: 3D Foam Snowflakes; Adhesive Sheets 4"x6"
DecoArt Americiana Decor ® Chalky Finish: Everlasting; Vintage
DecoArt Snow-Tex, DuraClear Ultra Matte Varnish
Sizzix Tim Holtz Alterations Die: Tattered Poinsettia
Derwent: Inktense Pencils
Large light bulb
Seam binding ribbon
Pearl lace
Cheese cloth
Spray of foam berries
Decorative pins
Tissue paper

Thank you for stopping by and for your lovely comments!

Big hugs

Asia King Blog signature_small

Follow on Bloglovin
♥ Follow Me On Bloglovin'
Read More

Saturday, 19 December 2015

Christmas Is In the Air And A Snowy Postcard

Re-eited: Yaaaay! My card was featured in the Designer Spotlight at Simon Says Stamp Monday Challenge! Woot woot!!! :)

Hello everyone and my warmest welcome on this pre-Christmas weekend :) I thought I would pop in to share another Christmas card I made - this one was inspired by Tim Holtz's December tag from 12 Tags of 2015.


I don't often play with tags (although I always promise myself to create more of them) so I extended the theme of Tim's inspiration tag onto a card.

I more or less followed the steps on Tim's tutorial. For the sprayed burlap panel I used Red Pepper Color Wash and Dreamweaver Holiday Greetings And Holly stencil. The main panel was stamped with Brilliance Pearlescent Olive ink (my fave ink ever!) using this gorgeous Stampendous Snowy Postcard stamp (my fave stamp ever!) and I added some shading with Inktense pencils (my fave pencils ever!). I also heat embossed in Detail Black the Christmas Air sentiment.


For the wreath I used a punch and dies from Martha Stewart, Spellbinders and Marianne's Designs and mounted the foliage with heaps of DODZ™ Small. Then I added a handful of baby cones (picked up outside my work office lol) and a Bella Bow sprayed with Red Pepper Color Wash. Spraying the felt bow made the ink concentrate in some parts more than in others and I loved the vintage, washed out look it created.


Finally I gave the card a light dusting with the Dylusions White Linen ink spray (my fave ink spray ever!) and a light brush with Everlasting Chalky Finish paint (my fave paints ever!).

Looks like I managed to squeeze in quite a few faves of mine in this little card lol. Oh well, I hope it was worth it and that you'll like my card! :).


Thank you for stopping by today and I'm sending you all lots of warm pre-Christmas hugs! xx

Asia King Blog signature_small

Follow on Bloglovin
♥ Follow Me On Bloglovin'

Also linking to:
Tim Holtz 12 Tags of 2015 - December
That Craft Place Challenge Blog - Christmas
Vintage Stamping Challenges #39 - Winter Trees
Simon Says Stamp Wednesday Challenge - Die Crazy
Country View Challenges - Create a Scene
The Craft Barn Weekly Challenge - Tree
Simon Says Stamp Monday Challenge - Just a pinch (of snow dusting)
Emerald Creek Dares - Celebrations Around the World
Read More

Wednesday, 1 July 2015

Near The Sea - Stampendous And May Arts Big Play Time!

Hello Friends! I am so delighted to see you visiting today because oh boy, we've got so much in store for you!

Prepare yourselves for heaps of inspiration, crafty tips and AMAZING prizes - all courtesy of two fantastic blog hops going on this week.

As always, to take part in the prize draws make sure to visit all participating blogs and leave some love! Actually leave lots of love cuz it makes us really happy! :).

First up is the Spellbinders Partner Blog Hop. It’s summer time and we are hopping together with some fabulous companies in the Summer Road Trip Partner Hop with Spellbinders.


Today's featured partners are:
Canvas Corp
DCWV 

Spellbinders is giving away some spectacular prizes during the hop! There will be three daily prizes and one grand prize! See the official contest rules here.

Better still! You know how much Stampendous people love their fans, so they will have some fun prizes on their blog as well. Three lucky winners will win one $20 Rewards Cards to go shopping on their website. To be eligible, you must be a US or Canadian resident, comment on their blog and that of each Stampendous designer’s blog posts each day of the hop and tell us in what state you live. Stampendous Official Contest Rules apply.

If that wasn't enough, our Australian friends will have a chance at a prize from our distributor down under, The Stencil Specialists, for commenting on Stampendous blog and designers blogs during the hop. Wow! Please make sure you add the region you live in when you comment.

Here's the full list of Stampendous DT blogs playing in this blog hop:

Featured Designer – Tenia Nelson
Featured Designer – Lyn Bernatovich
Asia King (that's me!)

But that's not all! Be sure to check out the Scrapbook Adhesives by 3L®'s blog as there will be more prizes to be won there - if that's not early Christmas, then I don't know what is! :)

You still with me? Good, because there's more fabulousity coming!

Stampendous is also hopping this week with May Arts ribbon specialists! Amazing or what?! Again, three lucky US residents and one Aussie crafter will see some fabby prizes going their way. Same rules apply to be eligible to win - leave some love on the participating designers' blogs and make sure to let us know in your comments where you live :).

Blogs taking part in the May Arts hop today:

OK. I think I've kept you waiting long enough. I can finally reveal what you've been so patiently waiting for LOL - my today's inspirational offering! What a better way to celebrate summer than with  a breeze in the sails and a nautical theme! :)

Near the sea nautical vintage card by Asia King

Supplies:
May Arts: Paper Cord Ribbon in pink, light blue and ivory

Scrapbook Adhesives by 3L®: Adhesive Sheets 4x6", MyStik® Permanent Strips, 3D Foam Squares - White, 3D Foam Pennants, DODZ™ - 3D

Spellbinders: Nested Lacey Pennants, Labels Eighteen

Plus: Cardstock by Bazzill Basics Paper®
Inktense Pencils (Derwent) - Dark Chocolate, Saddle Brown, Bark, Sea Blue, Willow, Iron Blue, Iron Green
Coffee Archival Ink and Frayed Burlap Distress Ink (Ranger Ink), Gothic Purple StazOn Mini Ink by Tsukineko®
Patterned papers (Vintage Experience, the Works), watercolour paper, metal ornate corners, burlap & canvas flower, self adhesive pearls, eyelets, decorative pins and brads.

Instructions:
1. Create a kraft card blank with A5 card front.
2. Using pink cardstock prepare a mat 1/16 inch on each side smaller than the card front. Adhere to the base with MyStik®.
3. Trim a panel from patterned paper 1/16 inch on each side smaller than the mat. Ink the edges and adhere to the base with MyStik®.
4. Dab embossing ink onto metal corners with Boss Gloss and sprinkle with Aged Ivory Enamel. Shake off the excess and heat emboss.
5. Adhere the corners to the card with Adhesive Sheets in the top and bottom right corners as shown.
6. Die cut a large Lacey Pennant from coordinated papers and adhere to the card, allowing the top left corner to hang off the card.
7. Create a centre panel from patterned papers, pink and beige cardstock (use the photo for approximate proportions) and adhere to the card using 3D Foam Squares. Add pearls along the right side as shown.
8. Stamp Wind In Sails onto watercolour paper with Coffee Ink and colour with Inktense pencils. Die cut and emboss with Labels 18 die. Adhere to the card with 3D Foam Squares.
9. Stamp Near The Sea sentiment on a scrap of kraft card in purple ink. Trim and form in your hands to create a small wavy banner. Adhere to the card.
10. Cover the 3D Foam Pennants with matching papers, add eyelets and suede twine and layer at the top of the card as shown.
11. Finish the card with a canvas flower and paper twine bows adhered with DODZ™ - 3D. Add final touches with brads and decorative pins.

If you are new to to my blog - please feel free to stay a bit longer and check out my other creations. If any of them sparked an idea for your next project, make sure to click the 'Follow Me' button in my sidebar to stay up to date with my future crafty shenanigans :). Also, do let me know how I can find you and visit you back.

We can also connect on Instagram, Pinterest, Twitter or Facebook!

That's all from me for now - I hope you enjoyed my today's offering. Thank you for all your kind and heart warming comments. Enjoy the creative ride and 'see' you again soon!

Big crafty hugs

Asia King Blog signature_small

Follow on Bloglovin
♥ Follow Me On Bloglovin'
Read More

Sunday, 14 June 2015

Home Sweet Home Journal Page

Hello my lovelies! I hope you are having a wonderful weekend. I'm back today to share this cheerful journal page. I've been really busy lately sorting different things for my home. As a result I've kind of lost a bit of mojo and momentum for my normal 'day-to-day' crafting. So I thought I would try some messy paint play in my art journal. And since my home is so much on my mind at the moment I thought I might as well use it as a subject of my page :).


The details on how I made this page are shared today on Scrapbook Adhesives by 3L's blog and you can fond my post here.

Supplies:

Also: E-Z Stars® Refillable Dispenser, Blue Pigment Powder, Gold Pigment Powder (Donna Salazar with Scrapbook Adhesives by 3L®
Other supplies:
Bloom stencil - PaperArtsy
Media: Inktense pencils; DecoArt Americana Acrylics, Prima Marketing Color Bloom sprays, Black Archival ink (Ranger)


Thank you so much for stopping by today! Have a wonderful Sunday!

Big crafty hugs

Asia King Blog signature_small

Follow on Bloglovin
♥ Follow Me On Bloglovin'
Read More

Wednesday, 3 June 2015

Cherish Yesterday, Live Today And Dream For Tomorrow


cherish yesterday, live today, dream for tomorrow Stampendous
Wheeeee!!! So super excited to say that my card received a Special mention from the talented DT over at Country View Challenges blog - thank you so much ladies! xx

Hello lovely Friends! Again time has somehow flown by and it seems like ages since my last post. I am starting to think, in fact I am certain of it, that the length of my hour is much shorter than the rest of the world lol. Do you ever get a feeling like this?

Today I'm popping in to give you heads up about this Cherish Yesterday card which is being featured today on the Scrapbook Adhesives by 3L's blog.

Rather than duplicating everything here, I hope you will find a moment to check out my post to find out all the details.

I will mention though that there will be lots of stamping, drawing and flower making involved :).


shabby chic vintage flower inspirational card
Cherish Dream - inspirational quote stamp from Stampendous. Powyższa sentencja to stempel firmy Stampendous
I've had rough few weeks so I needed to make something that would lift my spirits and make me smile - and flowers always make me happy! The inspiration for my daisy clusters was drawn from my talented blog friend Joanna who shares her beautiful creations at W Kartkowym Zaciszu.

DIY handmade paper flowers
All flowers used in this card have been hand made. Wszystkie kwiatki na tej kartce wykonałam ręcznie.
Supplies from Scrapbook Adhesives by 3L:
DODZ™ - 3D, DODZ™ - Medium, 3D Foam Leaves, MyStik® Permanent Strips, Pigment Powders - Brown, Gold (Donna Salazar with Scrapbook Adhesives by 3L®)

DIY handmade flower centers
The flower centres have an embossed enameled finish. Środki kwiatków mają błyszczące wykończenie pudrem do embossingu.
Other supplies:
- Stampendous - Cling Cherish Dream; Mahogany Tinsel Embossing Powder,
- patterned papers; kraft cardstock, green handmade paper, flower punches (Woodware), suede twines and ribbon (May Arts)
- Media: Inktense pencils - Derwent; Spiced Chai StazOn Mini ink, DecoArt Chalky Finish - Lace paint, gold pen

Hand drawn leaves
The leaves on my wreath were first stamped then drawn over with Inktense pencils. Liście na wieńcu zostały najpierw odbite a potem obrysowane za pomocą kredek Inktense.
That's all from me for today. Thank you so much for stopping by and for any kind words you'd like to leave behind. Your kindness means so much to me - thank you for being so wonderful!

Big crafty hugs

Asia King Blog signature_small

Follow on Bloglovin
♥ Follow Me On Bloglovin'

Challenges for this card:
Country View Challenges June - Shabby Chic
Our Creative Corner - What Makes You Smile (flowers make me smile)
Mixed Media Place Creative Gym #8 - Drawing/Pencils
Read More

Friday, 15 May 2015

It's All Clear Now - Stampendous and Clear Scraps Blog Hop

Welcome to the Big Blog Hop Finale!

Let me introduce you to our hosts today - Stampendous! and Clear Scraps! Woot woot! :-)

Yes, this week both design teams have been playing together creating beautiful and original projects - if you missed the previous posts be sure to check them out. You really don't want to miss all this creativity that's been shared this week!


My first contribution this week was this shabby chic Mother's Day card that I shared on Monday. But, in case you missed it, yesterday I also shared a Father's Day card which was my DT make for Scrapbook Adhesives by 3L.

When I started working on my DT assignment I was surrounded by lots of delicious Stampendous and Clear Scraps goodies so I HAD to throw them all in the mix :). My card features a really cool technique with gold leafing on acrylic sheets - if you'd like to find out more, hop over here to see my full tutorial.


And since we're having a blog hop, of course we also have prizes! We have three prize packages up for grabs and each will include our Cling Jumbo Filigree Stamp Set, a Jumbo Perfectly Clear Acrylic Handle, PLUS a Clear Scraps Mixable Album and some extra acrylic accents (NB. the winner must have a US shipping address).

But there's also a little (or not so little ?) surprise for Aussie crafters! The Stencil Specialists, one of our Australian Wholesale Distributors, is going to offer a prize to one Australian fan every time we have a giveaway for US players! For the Clear Scraps Blog Hop week, The Stencil Specialists are offering: a Stampendous Stamp, A Dreamweaver Stencil (LL size customer choice), A Silicone Mould, A Tub of White Ultra Light Paper Clay and 3 packs of Adhesive Gems. WOW… what a fantastic prize package!
Here's what you need to do to be in with a chance of winning. Visit all the participating blogs throughout the week and leave some love to let us know you've visited. The more love you share, the higher your chance to win. And most importantly - prepare yourself to be totally inspired!
 
And now it's time to show you my humble offering for today's hop - a CAS card! I know! Me and CAS don't usually play together (I confess, I am a devoted follower of 'more is more' approach lol). But this time I just wanted to keep the design fairly simple to showcase this fabulous Jumbo Parrot stamp set. This card is soon going to fly to my big brother for his upcoming birthday. We have a bit of a family 'story' involving parrots so I couldn't resist the possibility to use this theme for my brother's card :).  


My card is quite media-licious as I used a lot of different mediums (is it just me thinking that the word 'media' somehow doesn't sound right...?).

I started off by stamping my lovely birdie onto Authentique Nomad paper (Adventure collection) and coloured it with Inktense pencils. The colours I used are Bright Blue, Hooker's Green, Dark Aquamarine, Poppy Red, Sepia Ink, Cadmium Yellow, Golden Yellow, Tan and Iris Blue. After colouring I fussy cut the image.


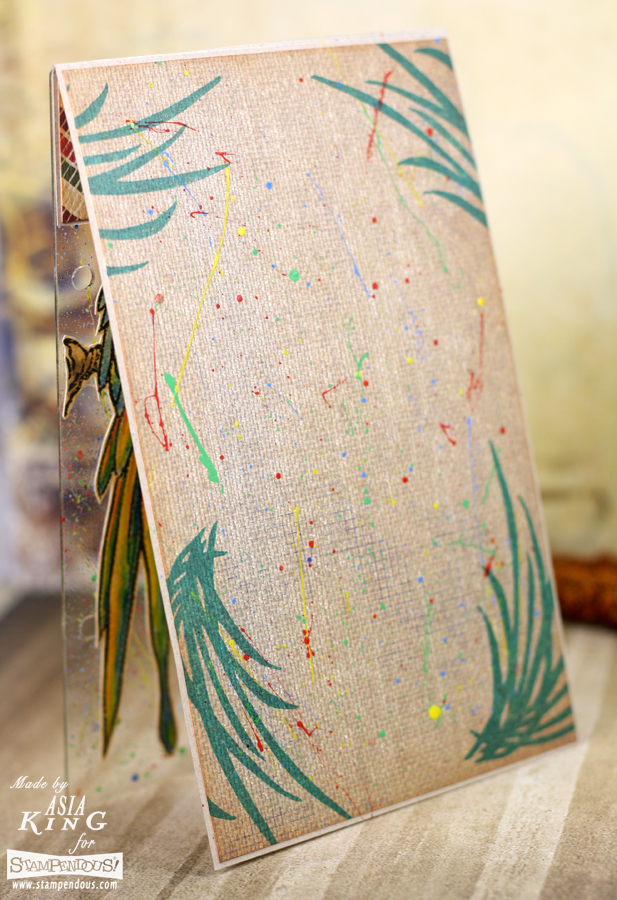
To create my card I used one of the acrylic sheets from the Mixable Lovely 5.75 x 7 Album which I secured to the card's base with Adhesive Sheets. To create the 'colourful jungle' background I added lots of splatters using DecoArts acrylic paints (Bright Green, Red Alert, Bright Yellow, Ocean Blue as well and white and black).

Once the paint was dry I stamped the Grunge Birthday sentiment with Jet Black StazOn. For the background I used BoBunny Sweet Life -Inspire paper which I stamped with Emerald City StazOn Mini and also splatted with paints.


That's all from me and I hope you enjoyed it :). Here is the list of the inspirational makes that await you today:


Thank you so much for stopping by and for all your wonderful comments! Don't forget to also check my Mother's Day and Father's Day cards for more ideas on using your stamps and acrylic sheets. And if you've enjoyed my offerings, how about signing up to follow my blog so you can see what's I'm up to in the future? :)

Have a fantastic and creative weekend!

Big crafty hugs

Asia King Blog signature_small

Follow on Bloglovin
♥ Follow Me On Bloglovin'
Read More

Monday, 11 May 2015

Mother's Day Peonies - Stampendous and Clear Scraps Team Up

Hello everyone! First of all my warmest welcome to my newest blog friends - thank you so much for joining in to follow my creative adventures :). And a big 'thank you' to everyone who's visited my previous post with the vintage balloons masculine birthday card.

Today I am playing with Stampendous and Clear Scraps who have joined forces for a whole week's worth of creativity, inspiration and fabulous prizes.

Yes, of course there are prizes! We have three prize packages up for grabs and each will include our Cling Jumbo Filigree Stamp Set, a Jumbo Perfectly Clear Acrylic Handle, PLUS a Clear Scraps Mixable Album and some extra acrylic accents (NB. the winner must have a US shipping address).

But wait - there's a little surprise for Aussie crafters! The Stencil Specialists , one of our Australian Wholesale Distributors, is going to offer a prize to one Australian fan every time we have a giveaway for US fans! or the Clear Scraps Blog Hop week, The Stencil Specialists are offering: a Stampendous Stamp, A Dreamweaver Stencil (LL size customer choice), A Silicone Mould, A Tub of White Ultra Light Paper Clay and 3 packs of Adhesive Gems. WOW… Fantastic prize package!
Stampendous & Clear Scraps blog hop giveaway with prizes
Join the fun, be inspired and win some fabulous prizes!
I'm sure most of you know the drill already, but in case you are new to the creative blog hop shenanigans, here's what you need to do to be in with a chance of winning. Visit all the participating blogs throughout the week and leave some love to let us know you've visited. The more love you share, the higher your chance to win. And most importantly - prepare yourself to be totally inspired!

My offering for today is a Mother's Day card I made for my Mum. In Poland we celebrate Mother's Day on the 26th of May, so you mustn't say a word to my Mum, because she hasn't seen the card yet lol :).

Mother's Day card - kartka na dzien matki
Mother's Day card - kartka na Dzień Matki
For my project I used the Lock Send it Clear Card set which is super cool, as the top elements kind of lock in allowing you to create a gatefold card.

My Mum also loves peonies so I made this beautiful Peony Spray image the focal point of my card. I stamped it onto the patterned paper with clear embossing ink, heat embossed it with the Black Detail Embossing Powder and coloured it with Inktense pencils.

asia king under a creative spell handmade cards
I made this beautiful Peony Spray image the focal point of my card. Na pierwszym planie umieściłam ręcznie stemplowaną piwionię (stempel Peony Spray ).
As part of my recent discoveries on Instagram, I've stumbled upon a new UK based scrapbook and decoupage papers company called Craft Consortium and I immediately fell in love with their designs. So imagine my pure delight when they invited me to have a play with their scrapbook papers - I couldn't wait to start crafting! So I just HAD to use the papers from the Gypsy Gypsy pad on my today's project - needs must, if you know what I mean! Lol :)

So first, I covered the back of my acrylic base with the paper and because the papers are double sided, the pattern shows through the front of the clear acrylic. I used Adhesive Sheets from Scrapbook Adhesives by 3L® as my adhesive as they are brilliant for this kind of thing (transparencies, vellum etc) - you get perfectly even coverage meaning the adhesive becomes virtually 'invisible'.

craft consortium patterned papers
To decorate my acrylic bases with patterned papers I used Adhesive Sheets. Moją akrylową bazę pokryłam ozdobnym papierem przyklejonym za pomocą Adhesive Sheets.
Then, I cut out a decorative panel from the Gypsy Gypsy pad which I over-stamped with Royal Heart Quotes, Vintage Ladies and Frantage Flowers Perfectly Clear stamps (inked with Sepia Archival) and with cling Vintage Letter stamped with DecoArt Americana Pink Chiffon acrylic paint.

stamping on acrylic sheets and acetate
I stamped the front folds with Lace Chalky Finish paint and added ink splatters. Do stemplowania zakładek użyłam farby Lace Chalky Finish i spryskałam również kleksy białym tuszem..
I also used the Vintage Letter stamp and the DecoArt Lace Chalky Finish paint to stamp the front folds. I finished the folds with a light mist of Dylusions White Linen spray and the DecoArt's Texture Crackle tinted with Pink Chiffon Paint. To secure my front folds I added hinges (die cut using PaperArtsy Hardware #1 die), which I laced up with crinkle ribbon from May Arts.

pink seam binding ribbon
To create the sentiment I added some cute alpha beads. Moją sentencję ułożylam z lieterek - koralików.
That's all from me for today! Here's the list of blogs playing today:


Thank you for stopping by and all your lovely comments. Have a super happy week and good luck in the draw!

Big crafty hugs

Asia King Blog signature_small

Follow on Bloglovin
♥ Follow Me On Bloglovin'

Challenges for this card:
Our Creative Corner - April Showers Bring May Flowers
Frilly and Funkie Challenge - Snap, Crackle, Crackle
Just Us Girls Challenge #292 - Embossing
Simon Says Stamp Wednesday Challenge - Let's Get Sentimental
Vintage Stamping Challenges #32 - Shabby Chic
Mixed Media Monthly Challenge #12 - May Flowers
Read More
.
Related Posts Plugin for WordPress, Blogger... All content, except where stated (including text, photographs and designs), is copyright of Asia King (Creative Spell Designs). I share my artwork for personal inspiration only. I don’t mind if you copy any of my designs for your own personal use, providing you give me credit by referring to my blog. You may not however copy my designs and photographs for contests and publications entries (online or otherwise) or to sell in either handmade or printed form. You may not copy my designs and photographs for advertising & commercial purposes, without my prior permission. Thank you for your understanding.
MyFreeCopyright.com Registered & Protected

Craft Blogs - BlogCatalog Blog Directory blog button flower Photobucket Crafty Blogs

Let's Tweet!

Powered by Blogger.

© 2011 Under a creative spell, AllRightsReserved.

Designed by ScreenWritersArena